
In this post, I want to highlight the steps to getting your ultimate backyard golf green. And to be totally upfront from the start, this post is aimed at those golfers who are wanting a full install premium synthetic golf green. This is not really for those after a DIY Green or some budget option. Just so we’re clear, what I’m discussing here comes at a cost – at a bare minimum, pricing is going to start at $220 – $250 per square metre and can go up from here. Total investment will start at $30,000.
Basic Information
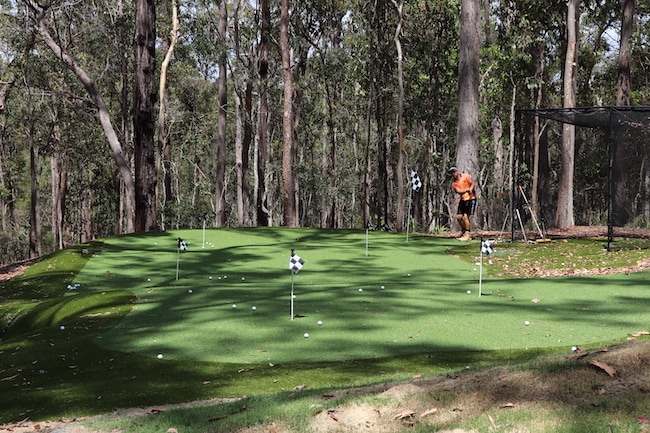
Size: total area around 350m2
Grass: Premium Australian-made grass designed for golf (lofted shots from distance all possible)
Accessories: 6 x cups and flags, 1 x bunker, 2 x tees and 1 x hitting net (with tee insert)
Cost: $60,000 + (this is a guide only. Each green is different)
Getting Started
The client started things off by checking out my website and getting as much information as possible in his own time. And this is my goal with this website – to be a rich source of information. When I was first in the market for a golf green, there wasn’t really any good information about these synthetic golf greens, so I wanted to change all that.
His next step was to arrange a site inspection. This is a paid service where I go over all the options with you and show you samples of the grass. But the most important function here is to look at the site and work with you to come up with a design/concept that’s going to work. This is not just a measure and quote, it’s a complete information gathering process where we come up with the best option for your location and budget.
Note: The inspection fee is deducted from any future work.
In my opinion, the client got his money’s worth from the inspection fee. His original concept green was going to be too small, the tees in the wrong location and ultimately the green wouldn’t have worked too well.
So I suggested a much longer green with a width of around 7.3m. This design allowed for the two tees to be situated much closer to the house, and most importantly, give golfers an excellent view of the green. Also, the longer green allows maximum room for stopping the ball from the 60m tee.
It was also at this point I suggested a hitting cage to the right of the green. There was a perfect spot for this and it wouldn’t affect the playing lines to the green. The black net almost become invisible – you look right through it so it’s definitely not an eyesore and it’s very handy to practise your full shots.

Construction
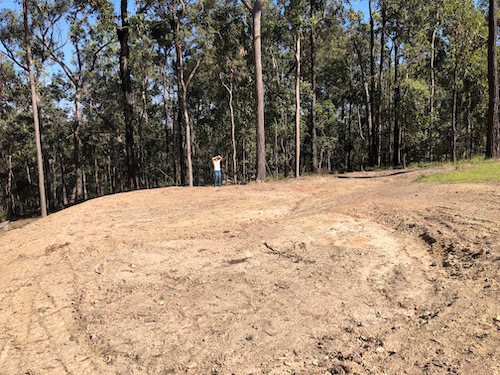
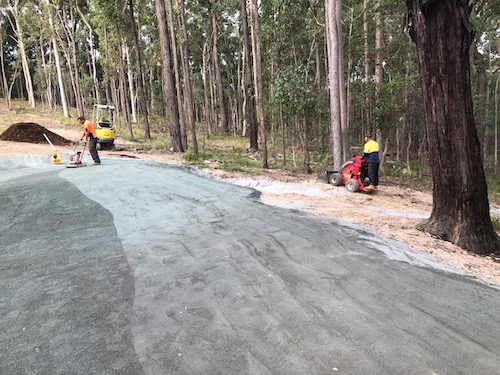
This site was a little tricky. The issue being that the green was to be built at the bottom of the property and our concern was water runoff. This is something one needs to avoid at all costs because running water can wash away the baseworks and this can be an expensive fix.
So our intention was to create some serious drainage options to divert the running water away from the green. And our plan to do this was verified when the project was halted by some serious Brisbane rain.
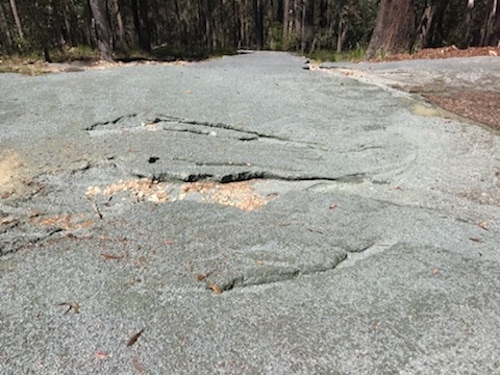
You can see from the image above how much damage was done by the runoff. If the green was completed without the water mitigation works, then the green most probably would have been damaged during the first major storm (and it certainly knows how to rain in BNE!).
And this drainage/water runoff is something we take very seriously. It’s easy to overlook this and just hope for the best. But it simply can’t be ignored and must be factored into every job.
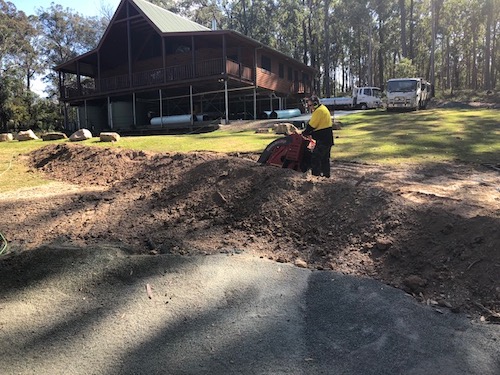
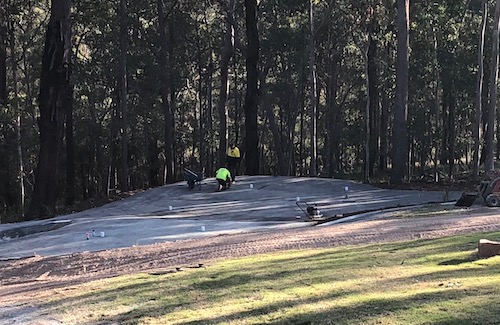
Base works
The base works are key. There’s no rushing this step because a golf green needs to be super smooth. I tell clients every other day, “These golf greens are not landscape grass and you can’t just slap something down anywhere. The base needs to be firm, it needs to be able to drain and it absolutely needs to be smooth”. And we don’t shy away from this and we certainly don’t rush this step.
At the end of the day the golf green will only be as good as your base. So we take our time (it usually takes 2-3 days to prepare the base properly) to ensure everything is perfect.
Cups/hole locations
I want to take a little time and highlight this important step. For many, the location of the cups is simply an afterthought. But I disagree strongly. The location of the cups are vitally important because,
– it maximises playing space
– increases enjoyment and satisfaction
– can offer more interesting shots/learning options
I have seen many golf greens where the cups have been slapped in without any thought. And what could have been a brilliant golf green, becomes something quite ordinary.
With this green, I spent over two hours with my chief installer getting the cups just right. A few of the hole locations picked themselves. But others were a little bit more tricky.
For example, the front of the green has a severe tier that goes down to the larger bottom section. In a perfect world, there wouldn’t be such a large tier, but sometimes we have to work with what’s there. There’s only so much earthworks can achieve.
So, the key consideration was to have the hole locations on the bottom tier usable. Especially those close to the tier. So we tested and tested and tested this location and I think we got it just right.
You can see from the video below, that any ball rolling down the tier can stop at the bottom hole location. It’s a tricky pin position, no doubt, but it’s not impossible.
Also, another thing I’m pretty anal about it making sure each hole location doesn’t bloke one behind it. On these backyard synthetic greens, there’s nothing worse than not being able to “get at” a flag because there’s another one in the way.
And with two tees, both at different playing lines, this took a bit of fiddling to get just right.
And finally, I had a fair bit of biffo with my installer on the 6th hole location. After a couple of hours of marking out the hole, then checking, then changing our minds, he was sure that five hole locations was spot on. I wasn’t so sure.
Something didn’t look right and I wanted to make sure the client got the absolute best golf experience for his money. I wanted to find a way to get a “Championship” hole location in. And this is where there’s a definitive balancing act…
… usually Less is More in this case. Too many cups and the green can look busy. But I could see a location at the back right of the green. My installer was resisting. He thought five cups were enough. I didn’t relent and insisted on creating a little extra tongue in the back corner.
And I’m glad I persisted because this Championship location is just brilliant. It took extra work but it’s well worth it.
From the back tee it’s a super tough shot to get it close. But it’s way easier to hit the ball close from the 35m tee. The extra section adds some nice shape to the green and it simply works. When I came back to inspect my installer said:
“I’m so glad we created this extra hole. The green is so much better”
One extra thing about the cups. Once we’ve selected the hole locations we install the cups – these actually go in before the grass is laid. And this is another full on process including,
1. The cups are installed at the proper height and everything is triple checked to ensure they’re level
2. We painstakingly ensure the immediate area around the hole is perfect. We’re super anal about this because we want the ball to roll into the hole smoothly. We certainly don’t want crazy bumps or nosedives around the hole. So we smooth out a circumference around each hole, measure it, tweak it and don’t settle until it’s spot on.
3. And just to be sure, we go over everything to make sure the hole locations are spot on. At this point, nobody is allowed to walk on the green so as not to compromise our “perfect” work.
Going the extra mile
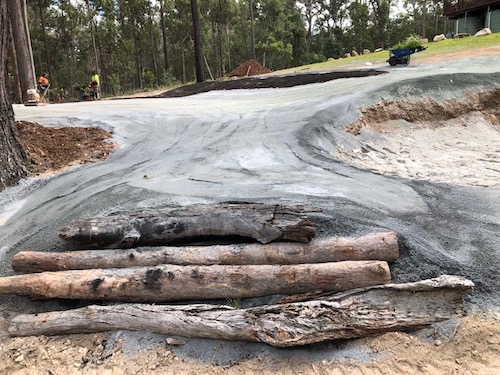
On day three I noticed the possibility for a run off area to the left of the green. This would help tie in the bunker and green together and also provide an area for bump and runs and lob shots over the bunker. On greens of this size it’s always the goal to provide the golfer with many playing options.
This not only makes the green more useable, but it helps your golf game. You learn more shots and this is also way more fun. Practise some tricky lob shots or learn to use different golf clubs (like for the chip and run shots) and watch how many shots you save on the course. It’s not uncommon for golfers to save 5-10 strokes per round simply by improving their short game.
But here’s the thing.
The run off area wasn’t included in the original design. The concept just hit me during the construction of the base works and bunker. Immediately my team could see my vision and they got to work. Our excavator driver went off into the backyard (with his machine) and came back with some logs. My installer dumped some extra base material and was already prepping the design.
Within an hour or two the new area was complete. And it worked perfectly and totally enhanced the original design. And I like to think this is all part of the process. Yes, there’s some science to building these golf greens but there’s also an art factor too.
And sometimes the magic happens after the initial concept. You can’t see the total vision until you start moving dirt and get your hands dirty. And it’s why, on these bigger greens, I like to be on site. I’m the project manager and can deal with any issues and communicate with he client, but I’m also there to impart my knowledge and make design modifications on the run.
This is what separates our work from many of our competitors. We take the time to build something that is truly remarkable and will give you years of enjoyment. We absolutely want to help you improve your golf game (if that’s your thing) but also ensure the green complex enhances your property and is going to keep looking great long term. And, this little section allows you to hit shots like this…
Laying grass
Now we’re ready to lay the grass. I need to point out that, for the most part, this is the easiest part. The base works, drainage and hole locations take the most time. On almost all jobs we take 2-3 days for all of this. Your final result will only be as good as the first steps.
Make no mistake, the laying of the grass is still important and we don’t rush this either. The grass is laid out roughly, then we trim to suit and join everything up. You may not know, but the grass is laid in the same direction. This ensures the nap is running in the same direction and you get the very best finish. If this isn’t done, then the green will look terrible – it will look like different grasses have been used.
Sometimes there’s no getting away from having a lot of wastage (we are forced to work with a specific area with no flexibility) but where possible, the design of your green has been done in a way to minimise wastage. And this is all worked out during the concept stage to give you the most bang for your buck. And where possible, we make your width of green, 3.7m, 7.4m, 11.1m or 15m wide.
In this case, we had a long 20 metre green, with a width of 7.4m. The fringe areas, where possible, are also created to maximise space and minimise any wastage.
Note: There’s almost always going to be some wastage of fringe, there’s no getting away from this.
View this post on Instagram
Infill
The infill is the secret sauce and don’t let anyone tell that you don’t need an infill. At this stage, the technology isn’t there for a non infill green.
The roll on the infill is 3 parts.
1. It gives the green it’s speed. Without infill, your golf green will run really really slowly.
2. It weighs the green down. On a green like this there’s at least a couple of tonnes of material brushed in so the green is going nowhere.
3. The infill helps absorb the impact of lofted shots.
We like to take the slowly slowly approach with infill. While it’s tempting to whack as much infill in at the start and walk away, I have found that it works better to err on the side of too little than too much. Why? Because it’s easier to add infill than it is to remove it. And I also like to err on the side of making your golf green slow than too fast.
Here’s why.
Even on a big synthetic golf green, it’s still small when compared to those “normal” sized real life greens. And if your synthetic golf green is too fast it’s just not as playable as it should be. Your downhill putts will be way too quick and you’ll have more trouble stopping your approach shots.
And I’m not talking super slow here. I pretty much aim for 10 on the Stimpmeter which is plenty quick enough for most.
And here’s another thing: Almost always, on the big installs, there will be something that isn’t quite right. Despite all of our best efforts, there will be something that you don’t like and/or will need modification (like a break of an area of fringe). So, we factor in a repeat visit in 4-6 weeks to come back and make any tweaks. And this is also the perfect time to make a final decision on the amount of infill.
4-6 weeks is the ideal amount of time to allow everything to settle and for you to test it thoroughly. And this is the ideal time to get the speed to your absolute desired level.
View this post on Instagram
Other things that need mentioning
So much goes into designing and installing these golf greens. If I went over everything I’d be here all day and probably bore you to tears. But here are some other points that need mentioning.
Golf tees: We installed two golf tees for this golf green set up. The first tee was at 35m and the second at 65m. These tees finish off the green nicely – they provide an excellent all year round playing surface and allow the green to perform at its maximum potential. A mistake some make is expecting an average type ball being able to stop after being pitched from an average type lawn.
It’s just not going to happen. For best results, you need a good, clean and firm lie and you need to hit a better quality golf ball. Cheap range balls are not going to work. And these golf tees absolutely tick all the boxes here. And we reckon they look pretty good too.
Bunker: Getting a bunker is more than just digging a hole and sticking some sand in it. Although that may work for some (I did this when I was a kid in my parent’s backyard) a good bunker needs some more planning. And the main thing is drainage. In this bunker there’s some serious drainage that will get most of the water out. This keeps the sand in the bunker, limits washouts and keeps ongoing costs down.
Hitting net and mat: The hitting net really adds to this golf green complex. We had the perfect location for it and it blends into the background. And sometimes, one may get a bit bored with putting, chips, pitches, lob shots and bunkers, so the net allows you to take out your frustration with your driver and other longer shots. And just so you’re sure, our golf net is super strong – it can withstand the impact of real golf balls over the journey – and the tee insert is premium.
Note: We’ve pioneered these tee inserts. They are awesome because you can insert a normal tee directly into them (no more rubber tees) and the hitting surface is super durable. You’ll struggle to wear it out. I haven’t come close to getting close to reaching the lifespan of my teeing inserts, despite thousands upon thousands of hits.
Rear of green: This is something we’re doing more and more of. It’s not applicable to every golf green, but in this case, some mounding and shaping at the rear was essential. The main reason is to give the ball some extra stopping power so it doesn’t run all the way down the slope at the rear. It’s just something small, but I feel it adds to the enjoyment of the green, especially when you can get the ball to stop quickly, and in some cases, even roll back down onto the green.
Summary
A lot of work and planning goes into each of these premium synthetic golf greens. They are certainly not plonked down in the quickest manner possible. There are many considerations and I treat each project like it’s my own little baby. As a result, they do come with a premium price tag, but I strongly believe you’ll be blown away by what you’re left with. In the video below, you can see Mat, my installer, hitting to the Championship hole location (he’s not normally this good at golf 🙂 )
If you have the room at your property and you’d like to explore the options and costs associated with getting something like this, then please contact us here. There’s no cost to get a ballpark price and if you’d prefer to call then please do so. My personal number is 0403372261 and I can go through all the options with you in around 10-15 minutes.